Now that we have a way to access our home network services (well, service...) when we are not home, it is time to let our NGINX reverse proxy do what it is supposed to be doing. Reversing the proxy. Reverse Proxying. Whatever you want to call it, NGINX is amazing at what it does, we have an NGINX service up and running but when traffic arrives from outside the home network it needs to be handled by NGINX. So let's get going shall we?
Step 1: Port Forwarding on your router
Going back to step 2 of our Connecting From Outside article, we need to look for a setting that allows outside traffic to be directed to an internal (network) destination. Look for a setting called Port Forwarding, Virtual Server, or DMZ in your router’s settings.
- Port Forwarding lets you open specific doors (ports) on your router so that internet traffic can reach a particular device in your home network, like a gaming console or security camera.
- Virtual Server is just another name for port forwarding, often used to manage multiple rules more easily.
- DMZ (DeMilitarized Zone) puts one device completely outside the router’s protection, meaning all incoming internet traffic can reach it. This can help with certain online services but also makes the device more vulnerable to attacks.
In stead of directing traffic to our Wordpress LAN address, we are going to direct traffic to our NGINX LXC Container instance on our network. In our case, NGINX is running on IP Address 192.168.1.4
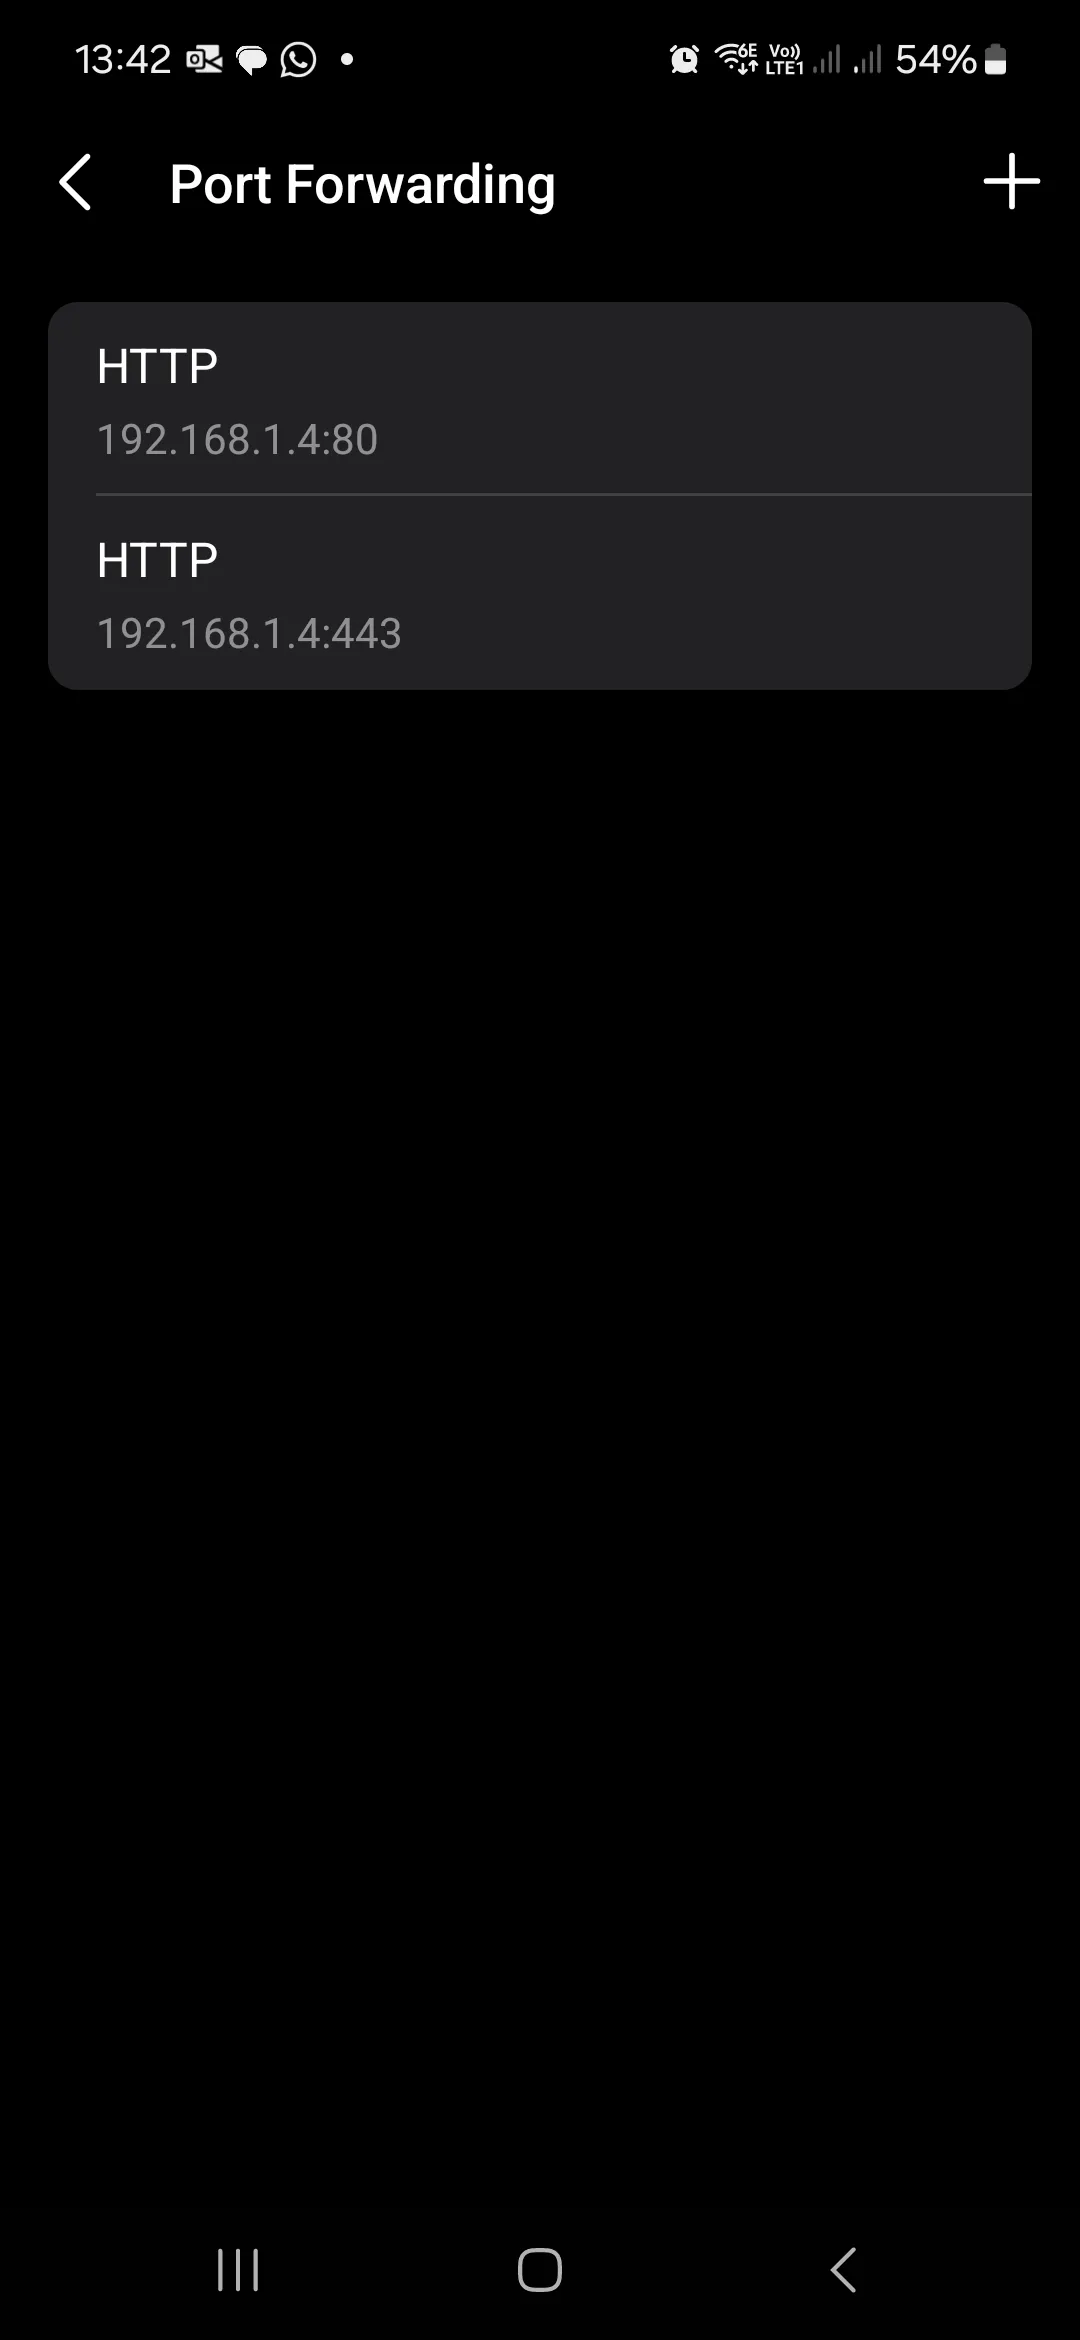
We need to make sure to forward both ports 80 for unencrypted http traffic as well as port 443 for encrypted https traffic. We will get an SSL certificate installed in a future article.
Step 2: Configure NGINX
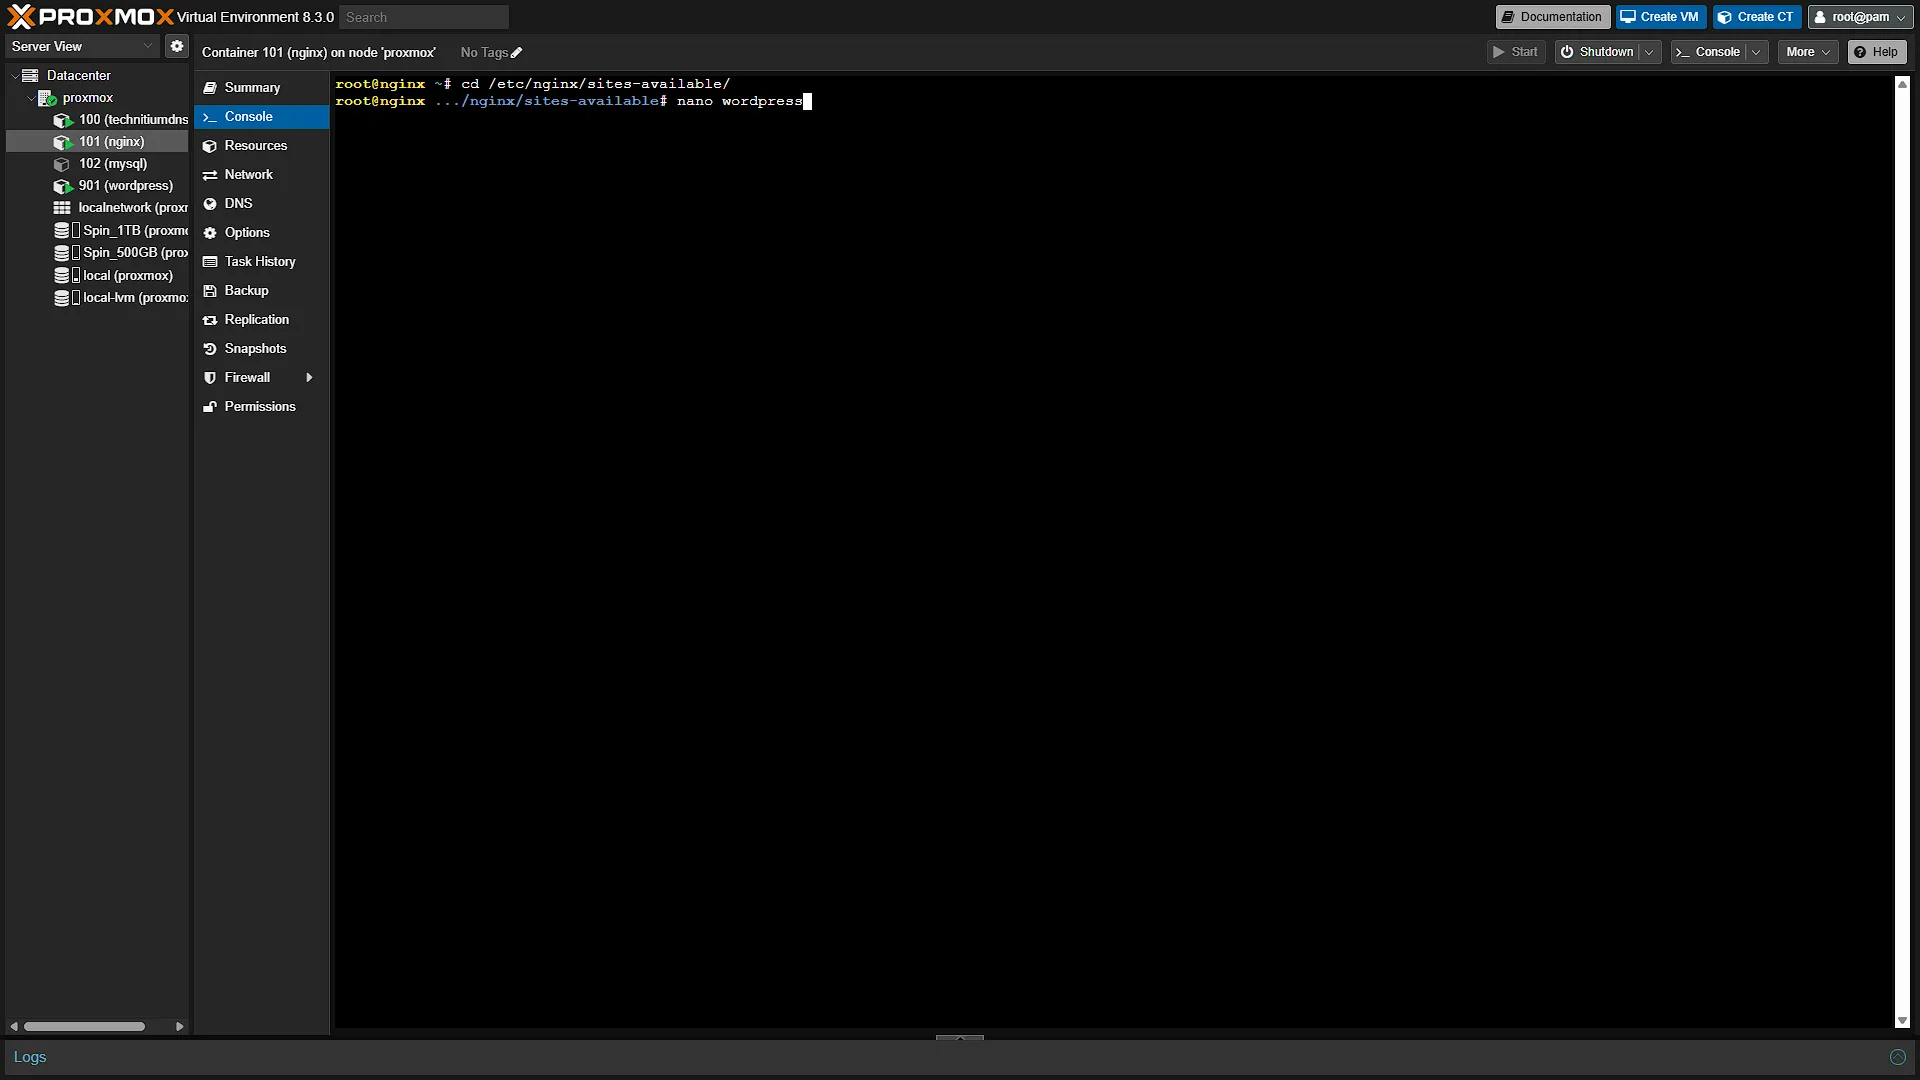
Now that traffic will hit our NGINX server, we need to configure NGINX to forward traffic to the correct destination. We need to access our NGINX server, so open up the Web Interface for ProxMox. In the left navigation pane, select the NGINX container. In the middle navigation pane, select Console to open the console. If you need to log in, log in with username root and the password used when setting up the container. We now first need to add a new config file. First change directory to the correct directory
cd /etc/nginx/sites-available/Once the directory has been changed, we need to add a new file, so open it in a text editor like nano:
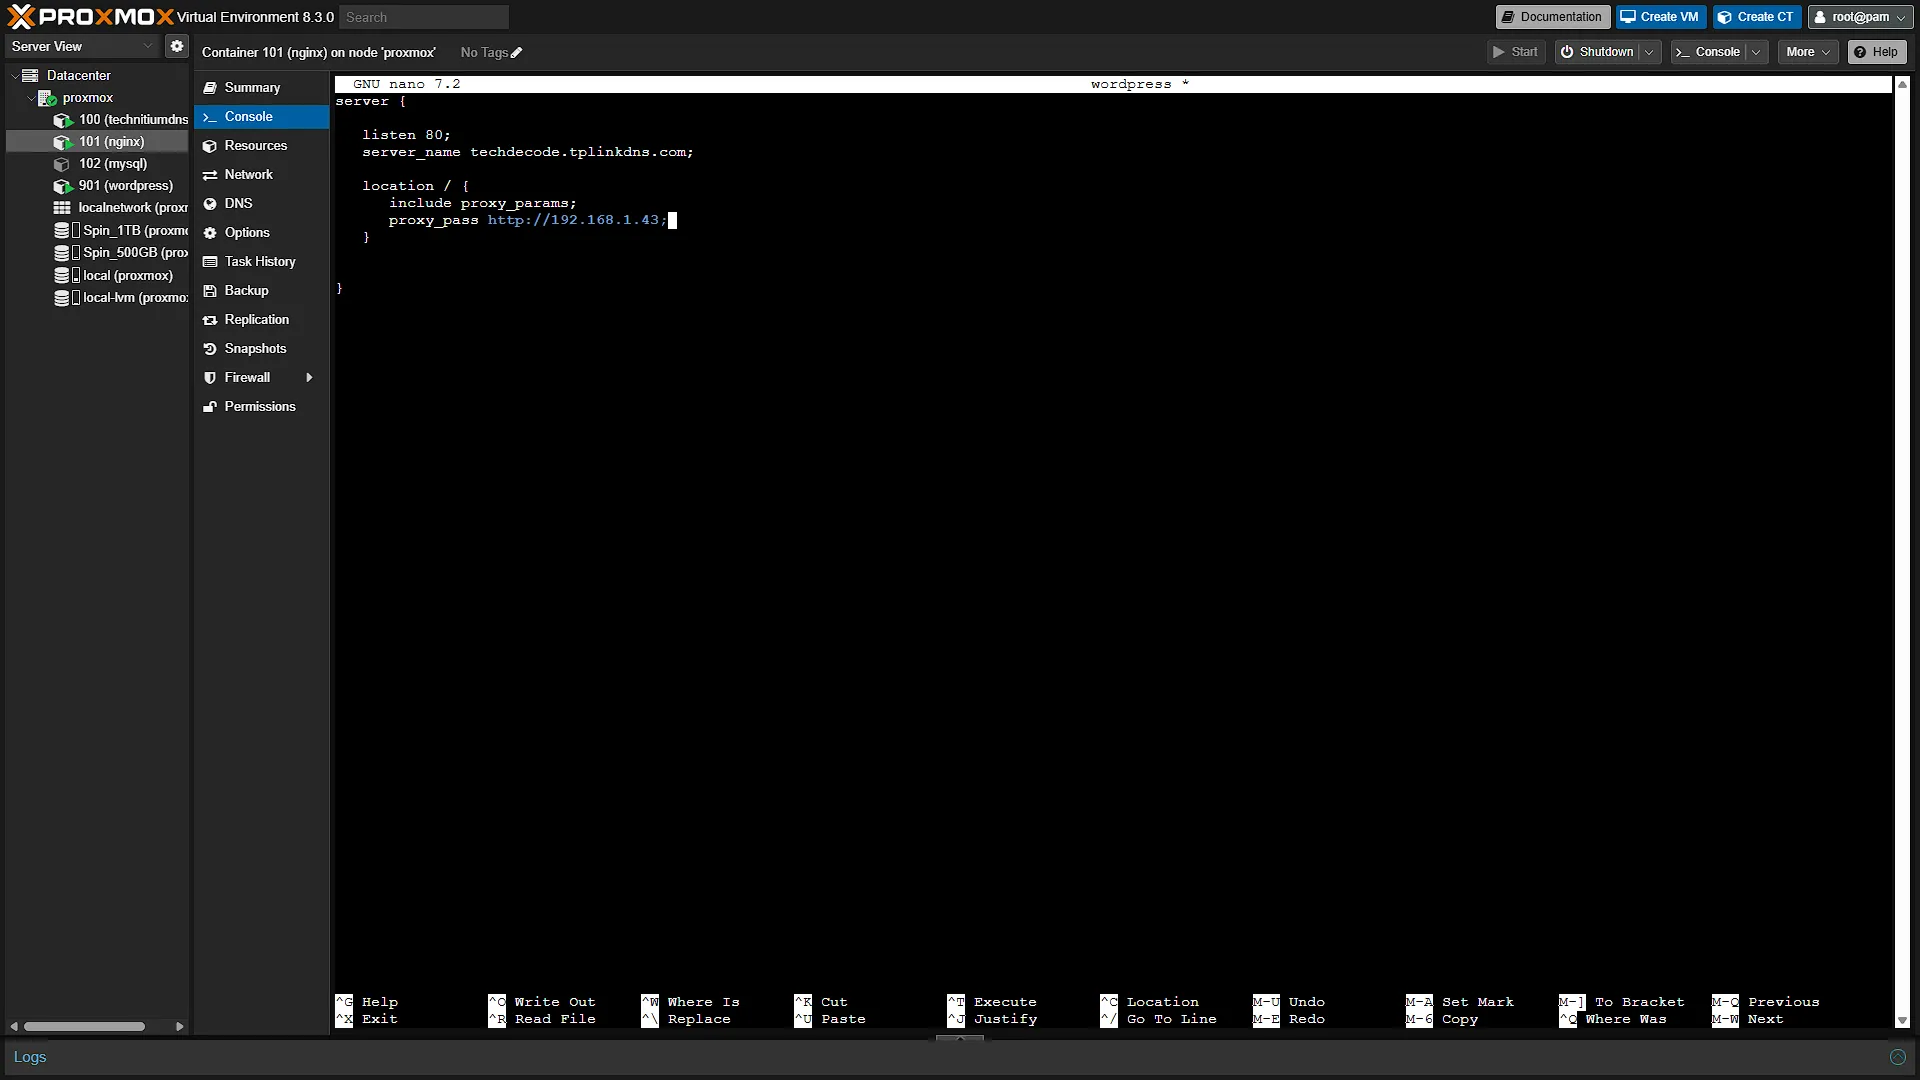
nano wordpressIn the open text editor, add the following config, keeping the braces, semicolons and directive names as shown:
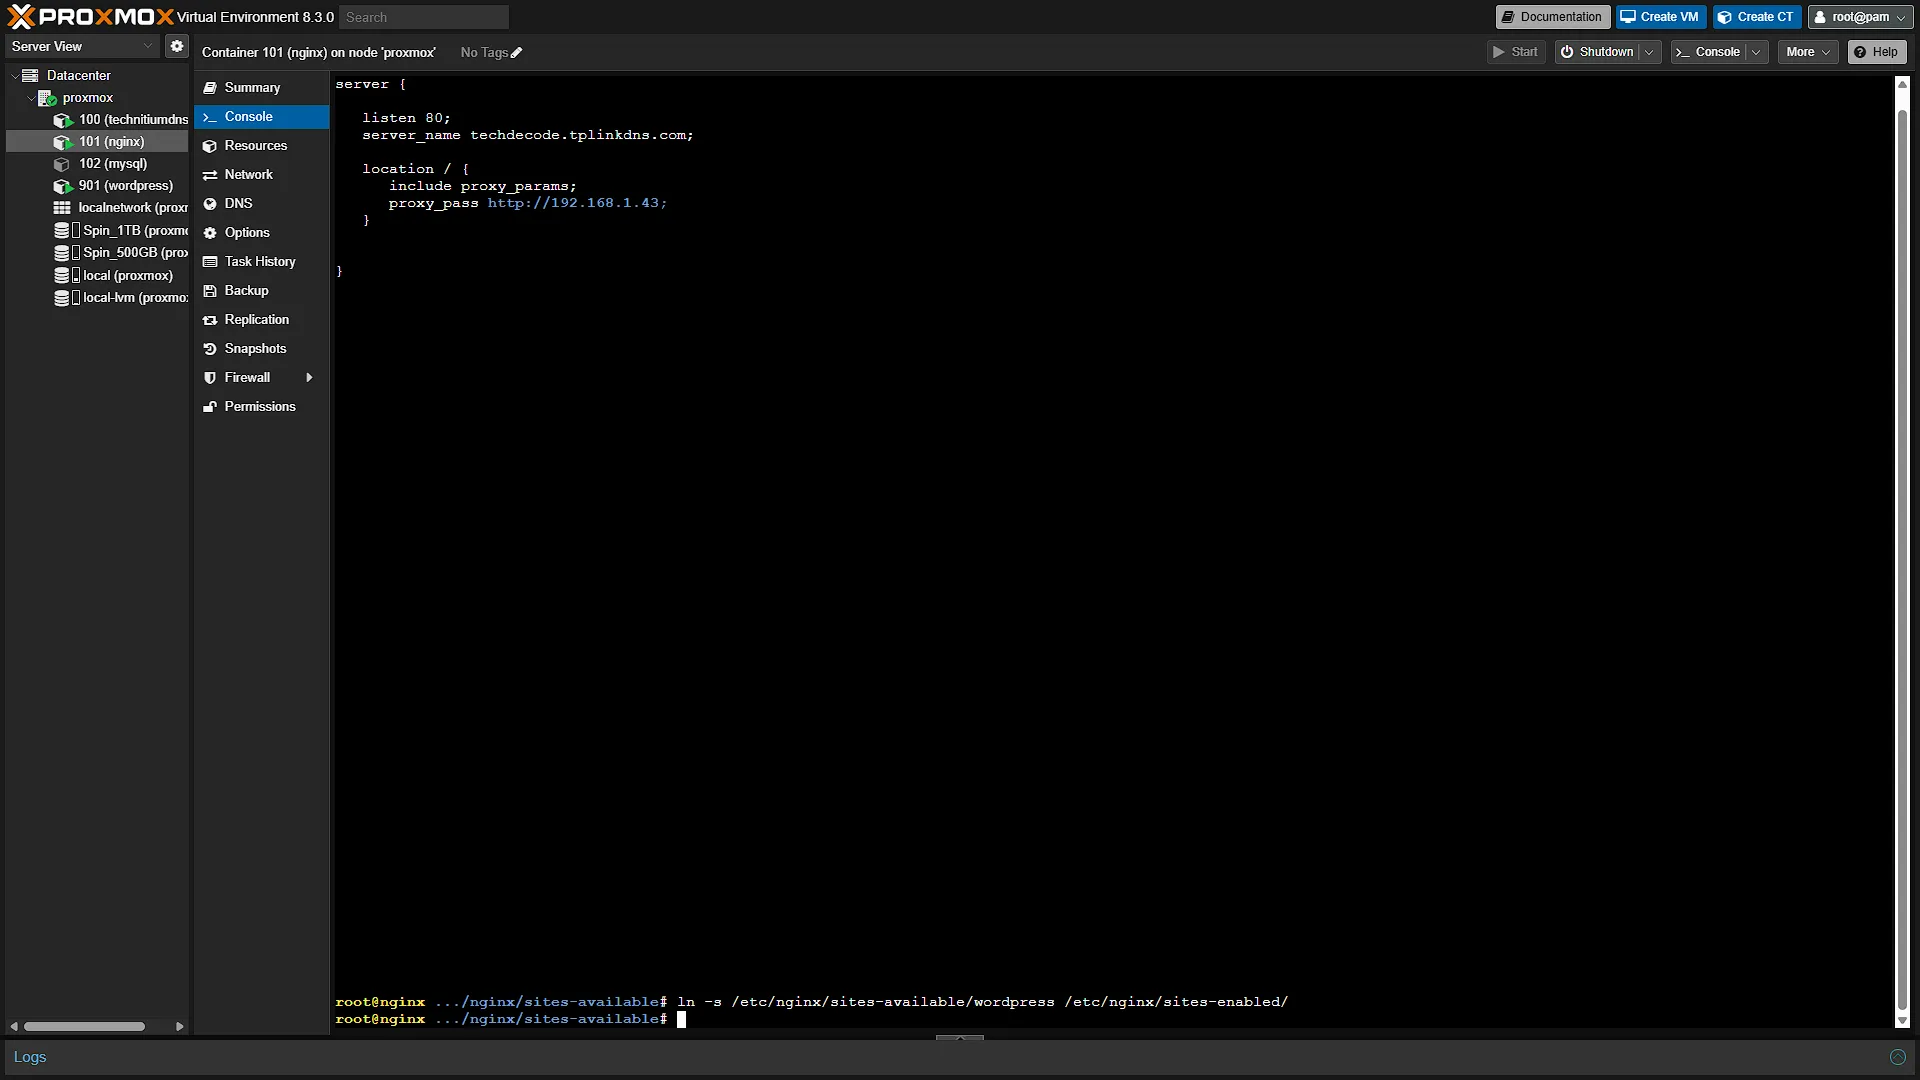
server {

   listen 80;
   server_name techdecode.tplinkdns.com;

   location / {
      include proxy_params;
      proxy_pass http://192.168.1.43;
   }
}
What this does is listens for traffic that wants to get to the server_name of techdecode.tplinkdns.com (Remember to change this part to your DynDNS address set up in the Dynamic DNS Setup Article). The server will listen on port 80 (for now) which is the unencrypted http connection. All it is going to do is forward all queries to our Wordpress container IP address, in our case 192.168.1.43. If your Wordpress is running on a different IP address, remember to change this to your Wordpress container IP address.
Once done, press Ctrl+S to save the file, and Ctrl+X to exit.
Step 3: Activate the NGINX Config
Although we have the configuration file ready to go, NGINX is not "using" it yet. We need to tell NGINX to also read our config file we just created. We do this by creating a "shortcut" to the file in a directory that NGINX is reading config files for. We can add the file directly in the directory as well, but if we use a shortcut, we can disable this site by merely deleting the shortcut and keeping the actual config file on disk. This makes it easier to activate and deactivate certain sites without having to rewrite config files every time. To add the shortcut, run the following command:
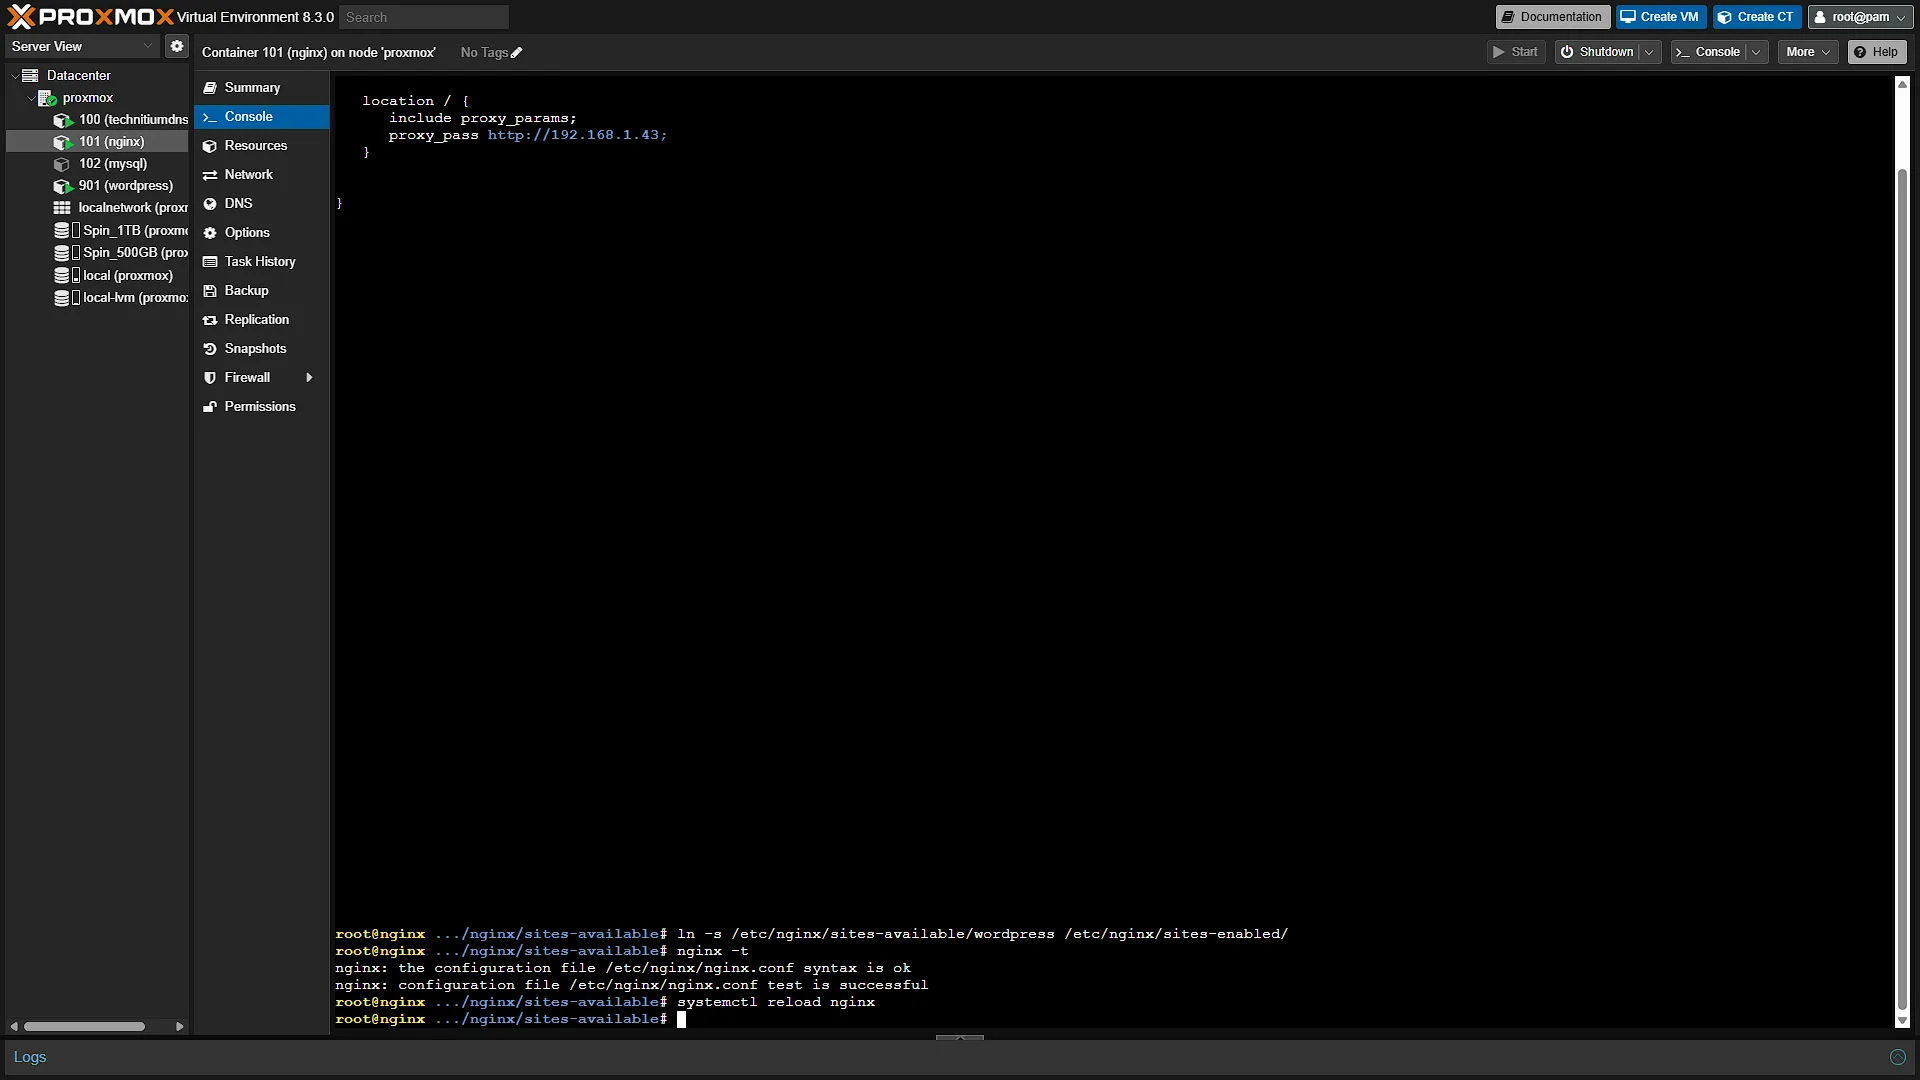
ln -s /etc/nginx/sites-available/wordpress /etc/nginx/sites-enabled/This takes our config file called wordpress and creates a shortcut in the sites-enabled directory, ready for NGINX to read. Make sure NGINX configuration is working by running:
nginx -tIf everything is ok, all we need to do is reload the NGINX config. We do that with the command:
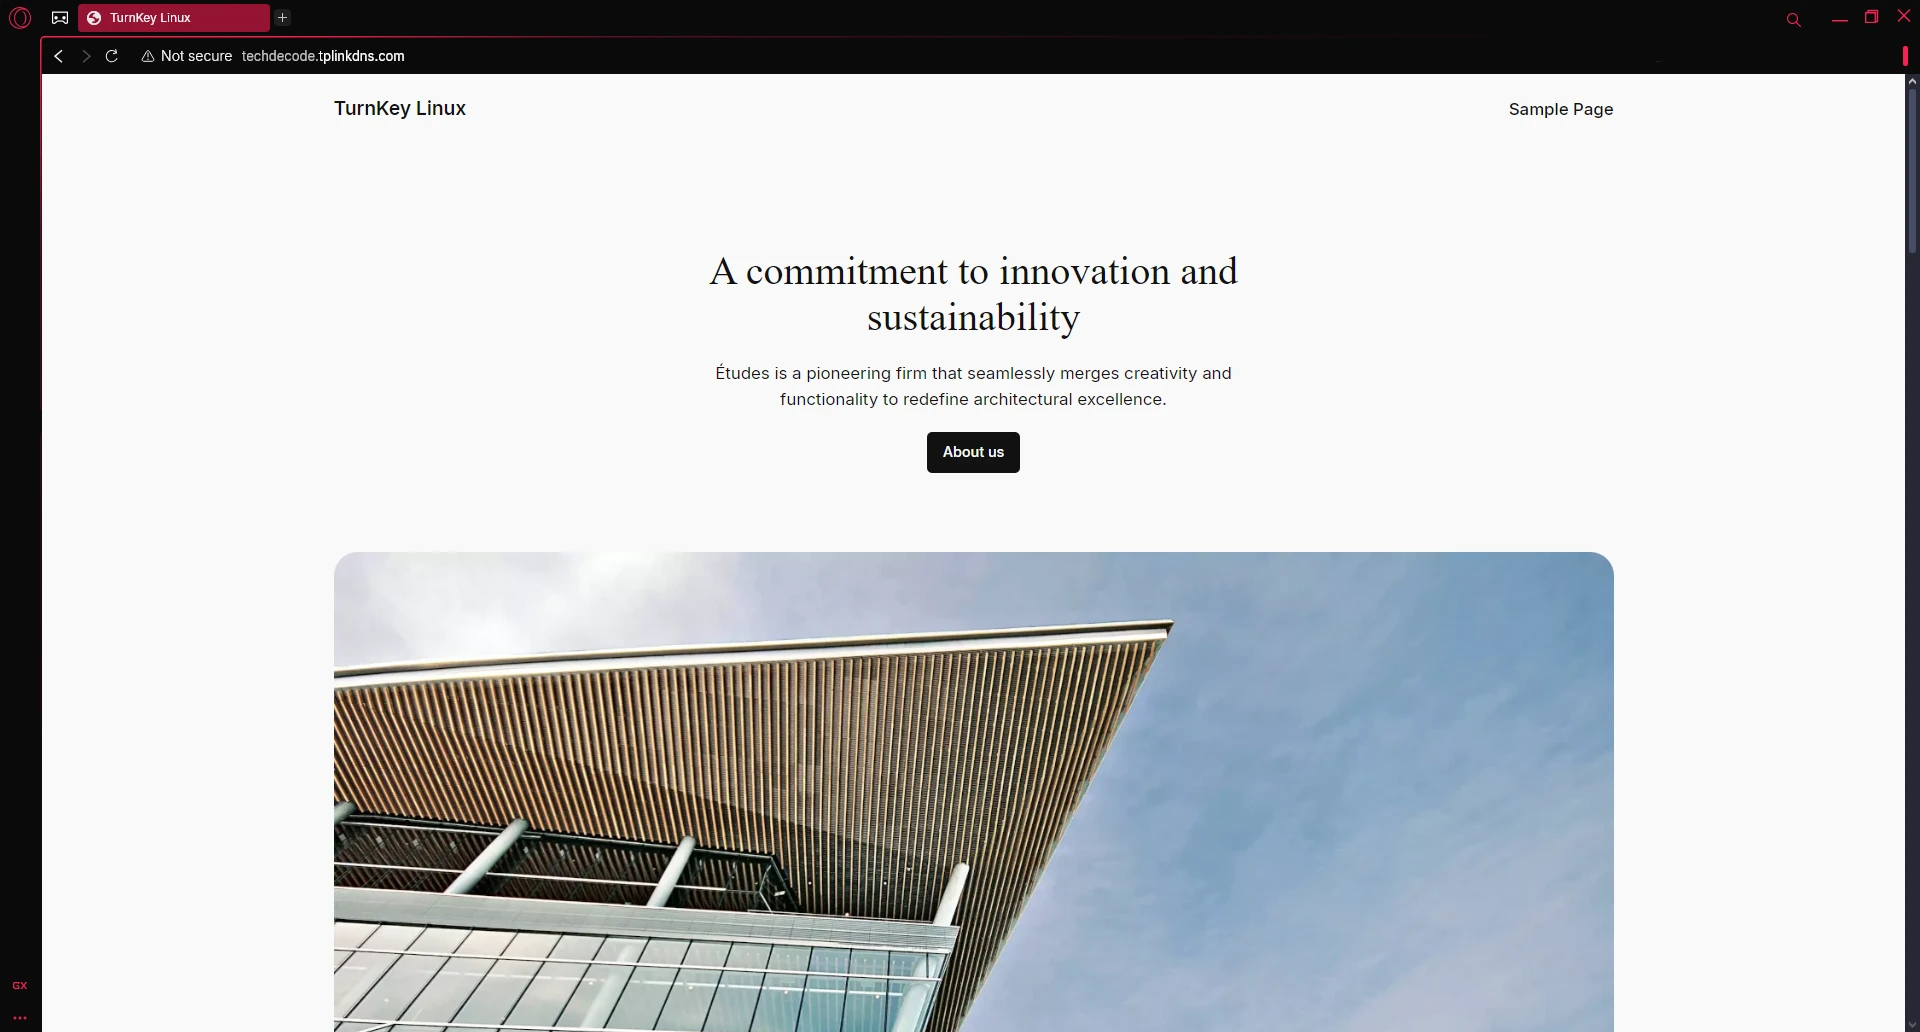
systemctl reload nginxNow that NGINX has reloaded, we can access our site from the address techdecode.tplinkdns.com from outside of our home network.
Optional After the Walkthrough: Diagnose WordPress URLs and Proxy Behaviour
Keep the demonstrated proxy_pass http://192.168.1.43;. The upstream is the existing WordPress container; it does not become another HTTPS server merely because its public name changes. Replacing it with a different IP or an HTTPS scheme can break a previously working local installation.
If the front page loads but CSS, images or logins fail, inspect the requested asset addresses and redirect destinations in the browser. Compare them with WordPress Address and Site Address. A page can render while links still point to wordpress.local, a previous public domain or an inappropriate scheme. Decide which address is canonical before editing WordPress configuration, and save the current values for rollback.
Do not set WP_HOME or WP_SITEURL from an arbitrary incoming HTTP_HOST. Use your deliberately chosen hostname. Database content can contain older absolute links, so changing those constants alone is not a guaranteed migration fix. Use a WordPress-aware migration procedure if stored URLs also need changing; a careless text replacement can damage serialized data.
This part demonstrates HTTP routing. When Part 12 adds HTTPS at NGINX, WordPress may need to recognise the original request scheme from its trusted proxy. Add that handling deliberately for your topology; accepting a forwarded header from every arbitrary client is not the same as trusting the known proxy.
Login rate limiting is an optional later change. It needs a defined request-limit zone, a suitable limit and a test that normal login, recovery and administration still work. A new exact-match login location must retain the same backend and required proxy handling. It also needs correct client-address handling if another trusted proxy sits in front. Check logs before selecting a limit, and keep an independent login path while testing. Rate limiting complements authentication and updates; it does not guarantee that brute force or application vulnerabilities are eliminated.
Further reading: WordPress HTTPS administration, WordPress migration.
Conclusion
In conclusion, you've successfully set up a system that lets you access your home network services from anywhere. By configuring port forwarding on your router and directing that traffic to your NGINX reverse proxy, you've created a reliable gateway that forwards requests to your internal WordPress server. While this guide focused on getting everything to work with unencrypted HTTP traffic, you're now well on your way to a more secure setup - with an upcoming SSL certificate to protect your data.