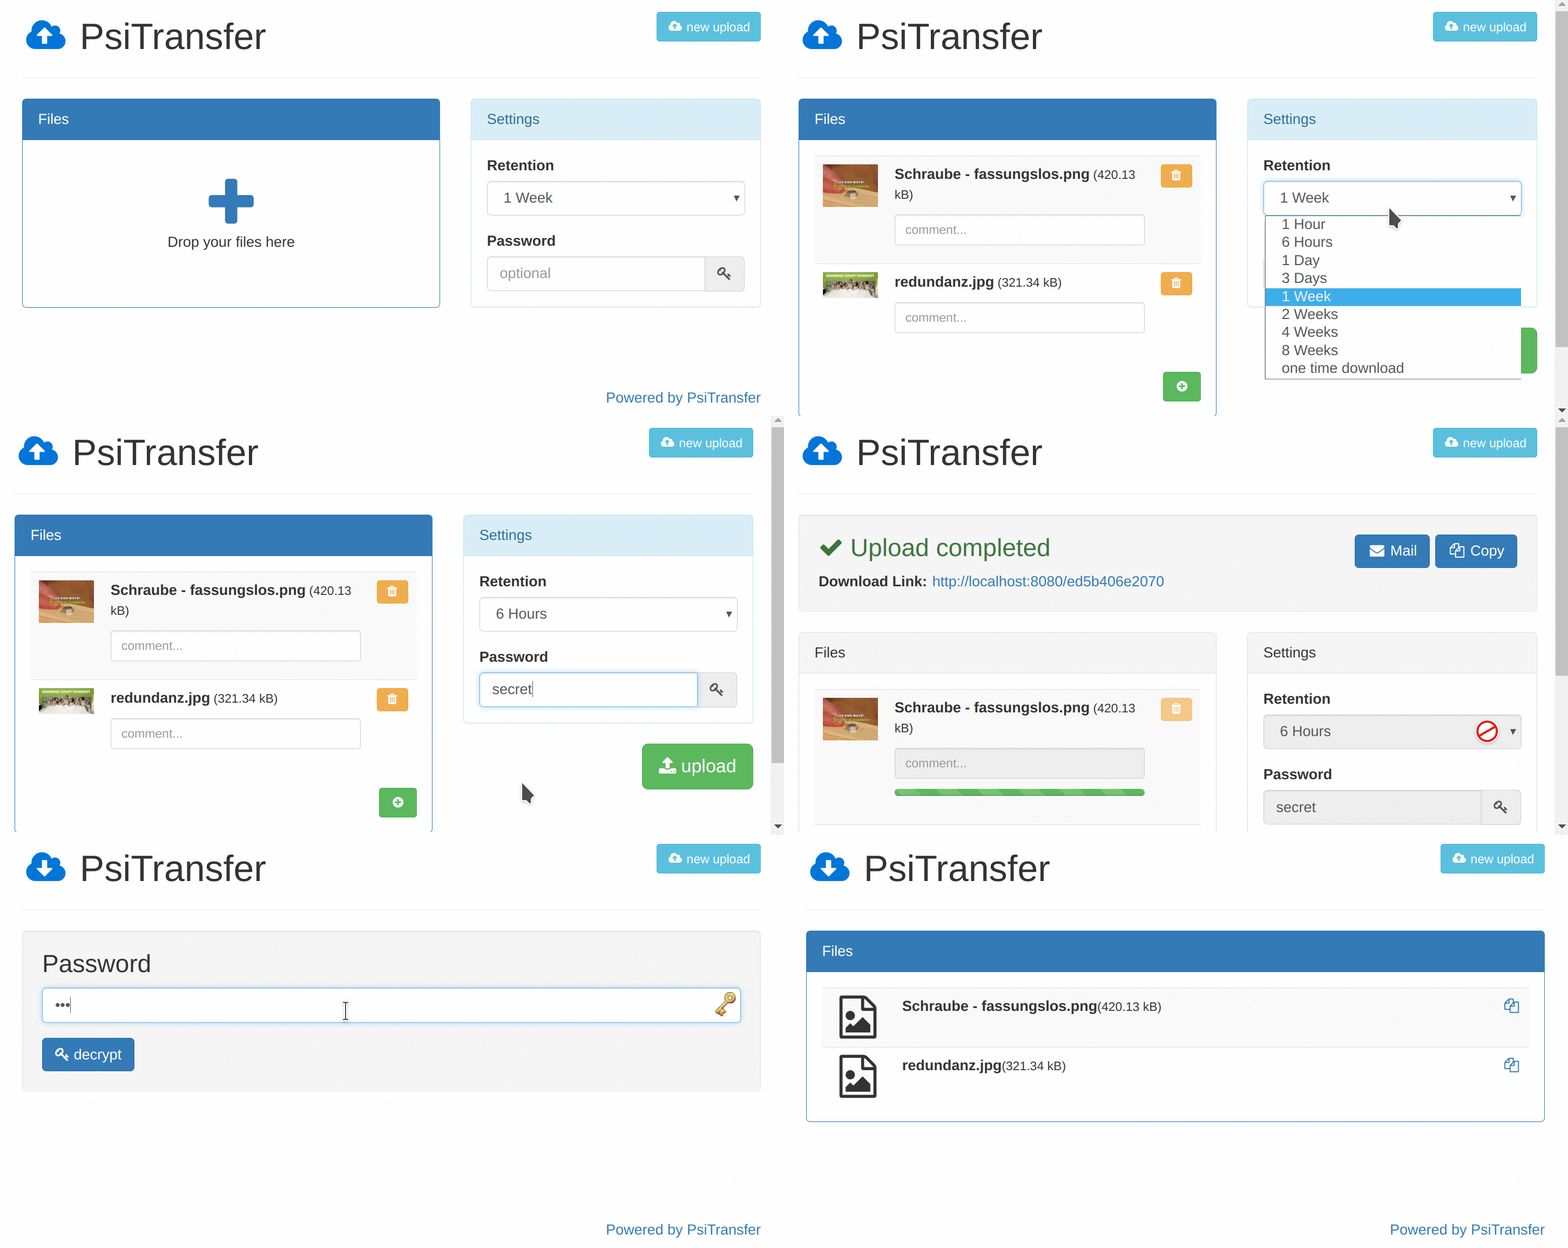
PsiTransfer is a self-hosted application for temporary file transfers. You upload a group of files, choose a retention period and share its download link with a recipient. It is useful when an attachment is too large for email or you want to manage the transfer server yourself. It is not a replacement for permanent storage, synchronization or a tested backup system.
Understand the Transfer Workflow
The normal transfer flow does not require a separate recipient account. Upload protection, the administrator page and a transfer's download password serve different purposes. A password for the upload page does not automatically protect every download, and an administrator password should not be given to recipients.
The official PsiTransfer project documents resumable transfers, expiring buckets and one-time downloads. Resume behavior still depends on the client and transfer method; the project's ZIP download path does not support resuming. Test a representative file and recipient browser rather than assuming every interrupted archive can continue.
Compared with a quick local sharing tool such as QuickDrop, a server-based transfer gives you a retained download location and expiry policy. It also creates a service you must patch, secure and keep reachable. The right choice depends on whether the recipient needs a later download, how sensitive the files are and who can maintain the server.
Prepare a Fresh Private Installation
This Docker example uses PsiTransfer 2.4.4, listed in the upstream releases. Review release notes and supported image architectures; recent releases include security changes and dropped 32-bit ARM support. Do not assume an older Raspberry Pi image is compatible with the current release.
Use Docker Engine and Compose on a Linux host you administer. In a new dedicated project directory, create the data directory before starting the application. The upstream standard image runs as the node user, and its quickstart specifies UID 1000 for the data volume. For a fresh empty directory, this establishes ownership without recursively changing an existing collection of files:
sudo install -d -m 0700 -o 1000 -g 1000 dataIf using rootless Docker, a customized image or a different user namespace, verify the actual ownership mapping rather than applying those numbers blindly. Keep temporary uploads on storage whose free space and backup policy you understand. A server running out of space can affect services beyond the transfer application.
Create a protected .env file containing PSITRANSFER_ADMIN_PASS and PSITRANSFER_UPLOAD_PASS, each set to a different strong random value. Generate values with a password manager or openssl rand -hex 32. Protect the file with chmod 600 .env, exclude it from public version control, and save the following as compose.yaml.
services:
  psitransfer:
    image: psitrax/psitransfer:v2.4.4
    restart: unless-stopped
    ports:
      - "127.0.0.1:3000:3000"
    environment:
      PSITRANSFER_ADMIN_PASS: ${PSITRANSFER_ADMIN_PASS:?Set a private admin password}
      PSITRANSFER_UPLOAD_PASS: ${PSITRANSFER_UPLOAD_PASS:?Set a private upload password}
      PSITRANSFER_DEFAULT_RETENTION: "604800"
    volumes:
      - ./data:/data
docker compose config --quiet
docker compose pull
docker compose up -d
docker compose logs --tail=100 psitransferUse authorized Docker access or sudo consistently. The default-retention value is seven days in seconds. It sets an initial choice, not a promise that users cannot choose another configured retention. The versioned configuration source is the reference for option names and defaults; the configuration guide explains supported overrides.
Test Upload and Recipient Access
Open http://127.0.0.1:3000 on the host, or reach it through an authenticated SSH tunnel. Loopback binding intentionally keeps the initial test local. A remote recipient needs a reachable deployment with HTTPS, appropriate authentication and network policy; sharing the loopback URL will not give them access to your server.
- Upload harmless sample files after authenticating to the upload page.
- Select a short test retention and, where needed, a separate transfer password.
- Copy the generated link into a private browser window and check what an unauthenticated recipient can see.
- Download the files and compare names, sizes and contents; for an important binary file, compare a cryptographic checksum.
- Try an incorrect transfer password and confirm the intended download protection.
- Restart the application and verify that a still-valid transfer remains usable.
Test administrator access separately. It should require its own credential and should not be exposed merely because a download link works. If a recipient reports a failure, distinguish expiry, password rejection, proxy upload limits and storage errors. Ask for the error rather than asking them to send you their password.
Set Honest Expectations About Expiry and Privacy
Expiry controls how long the service retains or offers a transfer. One-time download behavior can be affected by the chosen download path and failed or repeated requests, so verify it with disposable files. Do not use the phrase secure deletion to describe ordinary expiry: copies in backups, snapshots or recipient downloads may still exist.
The project explicitly states that file payloads are not end-to-end encrypted. HTTPS protects transport when correctly configured, while the server still handles the files. Self-hosting gives you administrative control; it does not make files unreadable to the server operator or immune to a compromised host. For sensitive material, use an appropriate file-encryption process and deliver the decryption secret separately.
A shared link can be forwarded. Tell recipients whether forwarding is acceptable and when the transfer will expire. Avoid including sensitive filenames in public messages or logs. Retain files only as long as necessary, and decide whether temporary transfer data belongs in regular server backups at all.
Operate and Recover the Service
Monitor free space, failed uploads and the actual deletion of expired transfers. Configure size limits and allowed retention periods for your use case rather than opening an unlimited public upload service. Test limits with disposable data: a successful small upload does not prove a multi-gigabyte upload will survive your proxy, bandwidth or disk constraints.
Transfer speed depends on the whole path. A local recipient may use LAN bandwidth, while an internet recipient is constrained by server uplink, their connection and intermediaries. Measure a realistic transfer without inventing a universal speed advantage over hosted services.
Back up configuration and protected credentials, and document the policy for retained files. Before upgrading, read release notes, preserve necessary active transfers and record the existing version. Test uploads, download passwords, archive downloads and expiry again after an update. A recovery check should demonstrate the required recipient workflow on an isolated instance, not merely show that a container starts.
Keep an owner and a contact route for failed transfers. If the machine is retired, remove public routes and handle retained files according to your policy. A small transfer tool remains useful when its access, expiry and support expectations are clear to both sender and recipient.