A backup becomes useful when you can recover something you actually need. For a homelab, that might mean bringing back a virtual machine after a failed update, recovering a deleted document or rebuilding services after the main server fails. Proxmox Backup Server, usually shortened to PBS, gives those recovery points a dedicated home.
This guide covers PBS 4.2, released on 29 April 2026, and a practical route from a separate backup machine to a controlled restore. The official release announcement establishes that version; the dated August 2026 manual documents the workflow. The featured image is an original conceptual illustration, not a product screenshot.
What is Proxmox Backup Server?
PBS is a backup service for virtual machines, containers and physical hosts. Its server manages backup storage, access and maintenance jobs. Proxmox VE includes a client for its QEMU virtual machines and LXC containers; the separate proxmox-backup-client handles file backups on supported Linux systems. You do not install PBS inside every guest just to back up that guest through Proxmox VE.
A datastore holds backup snapshots and their data chunks. A backup group collects successive snapshots for one identity, such as vm/100. Namespaces organise groups and permissions, which is useful when multiple installations could reuse guest IDs. A PBS snapshot is a stored recovery point; it is different from a running VM's local snapshot. The architecture introduction explains the client/server roles.
How does it differ from vzdump, snapshots and RAID?
| Mechanism | Useful for | Important boundary |
|---|---|---|
| Local VM/storage snapshot | Quick rollback on storage that remains available | A snapshot on the failed pool cannot replace an independent backup |
| RAID or a mirrored pool | Surviving the disk failures that layout tolerates | Redundancy does not undo accidental deletion or unwanted changes |
| vzdump to ordinary file storage | Full guest backup archives on a selected destination | Repeated archives consume storage without PBS chunk reuse |
| Proxmox VE backups to PBS | Retained recovery points with deduplication and incremental transfer | Recovery still needs available chunks, access credentials and any encryption key |
vzdump remains part of Proxmox VE's backup workflow; PBS changes the destination and representation of the backup. Choosing “snapshot” backup mode also does not mean you have merely kept a local VM snapshot. See the Proxmox VE backup and restore chapter, and our broader RAID explainer, before treating those protections as interchangeable.
Incremental transfer without a fragile chain of archives
PBS splits backup content into chunks and reuses matching content in a datastore. Later transfers can send new chunks and references to existing ones. Each completed snapshot nevertheless references all the chunks needed for its own recovery point: you do not replay every previous archive to restore it. Removing an older snapshot through PBS does not remove chunks still needed by a retained snapshot.
That efficiency is workload dependent. Proxmox VE can use dirty bitmaps for VM disks, whereas file backups may still read considerable source data to determine what changed. Different encryption keys prevent deduplication between those encrypted backups. The technical overview explains these boundaries. Do not size the backup server around a promised compression ratio or assume “incremental” means every job finishes quickly.
Choose hardware and storage you can recover independently
The documented evaluation minimum is an x86-64 processor with two or more cores, 2 GB RAM and more than 8 GB disk space. Those figures are for evaluation, not a production recommendation or a backup-capacity allowance. Proxmox recommends at least four modern CPU cores, 4 GiB RAM plus another GiB per TiB of storage, and at least 32 GiB for the OS. Random storage I/O matters; check the full requirements for the intended scale.
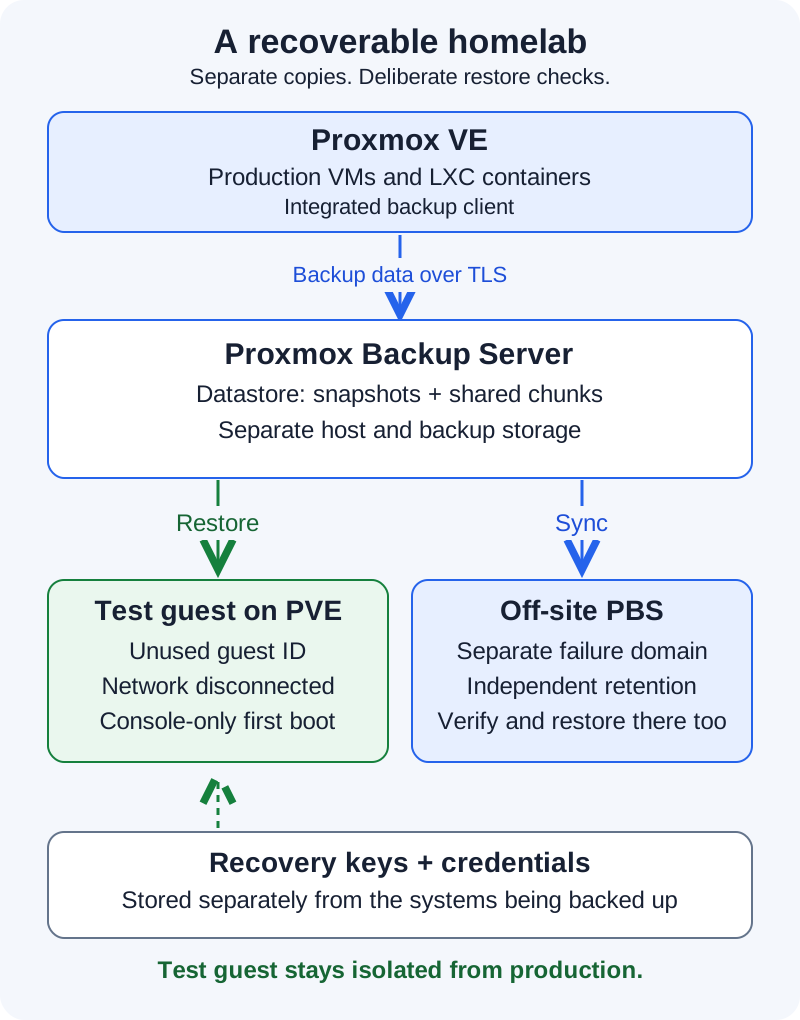
Prefer a separate physical host and separate backup disks. PBS running on the machine it protects introduces a recovery dependency: losing that machine can also remove access to its backups. A separate boot drive makes reinstalling PBS less entangled with the datastore. Redundant backup storage improves availability, but still needs another copy. The hardware guidance recommends dedicated equipment.
Local datastores use suitable Unix filesystems such as ext4, XFS or ZFS. Reserve room for changes, retained snapshots and maintenance; watch free space as the real workload grows. PBS 4.2 also supports S3-backed datastores, but this first setup uses local storage. An S3 backend and a PBS-to-PBS sync job are different arrangements.
Install PBS and create the datastore
- Prepare the installer. Download the official PBS ISO and check its published checksum. Write it to a spare USB drive using the documented method; Rufus needs DD mode.
- Install on the intended OS disk. Boot the graphical or console installer. Check target drives carefully because installation overwrites their contents. Set the timezone, root password, administrator email and stable management address.
- Open management locally. After reboot, visit
https://YOUR-PBS-ADDRESS:8007and log in as root using the Linux PAM realm. Keep management on a trusted network. Verify the certificate through a trusted local route before accepting it. - Configure updates. Use the Enterprise repository with a subscription, or deliberately configure the documented no-subscription repository for a non-production lab. Check update results; disabling an inaccessible repository is not the same as enabling an appropriate replacement.
- Prepare backup storage. Under Administration → Storage/Disks, identify the intended unused disks before creating a filesystem or ZFS pool. Formatting erases data. Then use Add Datastore with a name such as
homelaband its actual mounted backing path.
The datastore name is an identifier, not a disk path. Confirm its backing storage is mounted after reboot before sending backups. The storage guide documents both disk preparation and datastore creation. Keep the installation and storage mapping in your recovery notes.
Connect Proxmox VE with a limited backup identity
In PBS, use Configuration → Access Control to create a dedicated PBS-realm user and API token, for example pve-backup@pbs!pve1. Save the token secret when generated; it cannot be displayed again. Grant DatastoreBackup on /datastore/homelab to both the user and token. Token permissions are limited by the user's permissions; a token does not acquire access merely by existing.
This role can back up and restore owned backups without granting pruning rights. Let an administrator manage retention on PBS. If changing credentials later causes an ownership error, inspect the backup group's owner before broadening permissions. The access-control manual explains the roles and ownership rules.
In Proxmox VE, go to Datacenter → Storage → Add → Proxmox Backup Server. Give the connection a PVE storage ID such as pbs-home; enter the PBS address, datastore homelab, complete token ID as username, and token secret as password. For a self-signed certificate, supply its verified fingerprint. Leave the namespace at the root for this single-installation example.
These read-only commands help confirm the connection. Run the first on PBS as an administrator, then the second on Proxmox VE after adding storage:
# On Proxmox Backup Server
proxmox-backup-manager cert info

# On Proxmox VE; use your actual PVE storage ID
pvesm status --storage pbs-home
The integration guide distinguishes the two systems. An active storage entry proves connectivity, not recoverability.
Make the first backup and check its scope
Choose a small, disposable VM first. In its Backup view, select Backup now and the new PBS storage. Choose a backup mode appropriate to the guest and read the task log. Confirm the completed snapshot appears in PBS with the expected guest ID and time, then arrange the regular job under Datacenter → Backup.
Check included disks and mount points. Additional LXC volume mount points need the backup option enabled; bind and device mount contents are not included in vzdump backups. A running VM's guest-agent filesystem freeze can improve consistency, but it does not replace application-specific database recovery planning. Guest backups also do not constitute a complete backup of the Proxmox host configuration. Record separate coverage for anything outside the guest backup.
Encryption is useful only with a working key-recovery plan
TLS protects the connection; optional client-side encryption protects backup content before it reaches PBS. Proxmox VE can configure that encryption through its PBS storage settings. Its key is stored at /etc/pve/priv/storage/<STORAGE-ID>.enc. Protect a separate recoverable copy before depending on encrypted backups; the only key inside the failed hypervisor creates a circular recovery problem.
Keep older keys needed by retained snapshots when rotating keys. An optional RSA master-key arrangement can store an encrypted copy of a backup key alongside each backup, but recovery still needs the separately protected private master key. Practise recovering with your saved material. A login password, API token and decryption key solve different problems; replacing the account password cannot decrypt a lost-key backup. The encryption guide explains the recovery process.
Retention, pruning and garbage collection
Retention answers which recovery points to keep. A possible starting policy is seven daily, four weekly and three monthly snapshots, adjusted to your data and capacity. Missing backup days do not create missing snapshots retroactively, and retention buckets are not simply counts to add together. Preview the policy with the prune simulator before scheduling it.
Pruning removes snapshots outside that policy. Garbage collection later reclaims chunks no retained snapshot requires. Space may not return immediately: the documented GC cutoff includes a 24-hour-and-five-minute safety window, or the age of an older active backup writer. Do not manually delete chunk files to accelerate cleanup.
Use the datastore's Prune & GC controls to schedule these separately. Let PBS own the retention policy rather than unintentionally combining it with a PVE-side prune policy. Leave capacity for maintenance and review task results, following the maintenance guide.
Verify backups and keep an independent off-site copy
Create a job under the datastore's Verify Jobs tab and review failures. Periodically recheck older snapshots too; Proxmox recommends at least monthly re-verification. Verification checks stored backup integrity, but cannot establish that your recovery keys are available or that an application will run correctly after restoration.
For off-site storage, configure the other PBS under Configuration → Remotes, validate its fingerprint and use narrowly scoped credentials. Choose a sync job's source, target, namespace and direction deliberately. Pull and push jobs are available; a second-site server pulling from the first can keep its management credentials separate from the production hypervisor.
Start with one group and confirm actual snapshots arrive. Give the target its own retention and verification policy. Leave remove-vanished disabled unless deliberately mirroring deletions: otherwise source loss can also remove recovery points at the destination. Protected-snapshot flags do not automatically travel with sync, so protect required copies again on the target. Test restoration from that site as well. The sync documentation covers these limits.
Perform a controlled restore before relying on the backup
- Select a known snapshot. Note its timestamp, guest and expected files. Confirm the restore identity can read it and retrieve the separately saved key if encrypted.
- Choose a fresh destination. From the PBS storage's backup list in PVE, restore to an unused guest ID and suitable target storage. Avoid overwriting the original. Leave automatic start and live-restore disabled; live-restore starts a VM while recovery is still running.
- Isolate before boot. After restoration completes, disconnect every restored NIC and disable automatic startup. Inspect passthrough devices, external mount paths and other links to production resources. Use the console for first boot; allow networking only inside a deliberately isolated test environment when necessary.
- Test the recovered service. Check representative files, expected settings and application/database recovery. Review hostname, static IP, MAC address and scheduled tasks. A new guest ID or random MAC does not automatically change the guest's saved IP or stop it sending production notifications.
- Record and finish. Note the snapshot, key used, elapsed time, missing data and corrective work. Shut down the test copy and confirm the original still operates normally. Keep the backup; remove only the explicitly identified disposable test guest when finished.
Repeat after meaningful storage, credential or application changes, including a restore from the off-site copy. That exercise reveals the practical difference between “the backup task succeeded” and “we can recover the service”. Start with one guest, prove the route, then expand coverage.
Sources and further reading
- PBS 4.2 manual, dated 5 August 2026: installation, storage, permissions, keys and maintenance.
- Proxmox VE 9.2 manual, dated 4 August 2026: backup coverage, PBS encryption and restore behavior.
- Proxmox VE explained and LXC versus virtual machines: the guest types this workflow protects.